What You Need To Create Your NFT Collection
In this post, we will go over the list of things that you need to have ready before using our NFT generator and we will also tell you how to get each of those necessary things.
January 08, 2021
●
7 min read

How to create your NFT layers
All you need is layers
The first thing that you need to have to create your NFT collection are the layers that you will use to create the generative art.
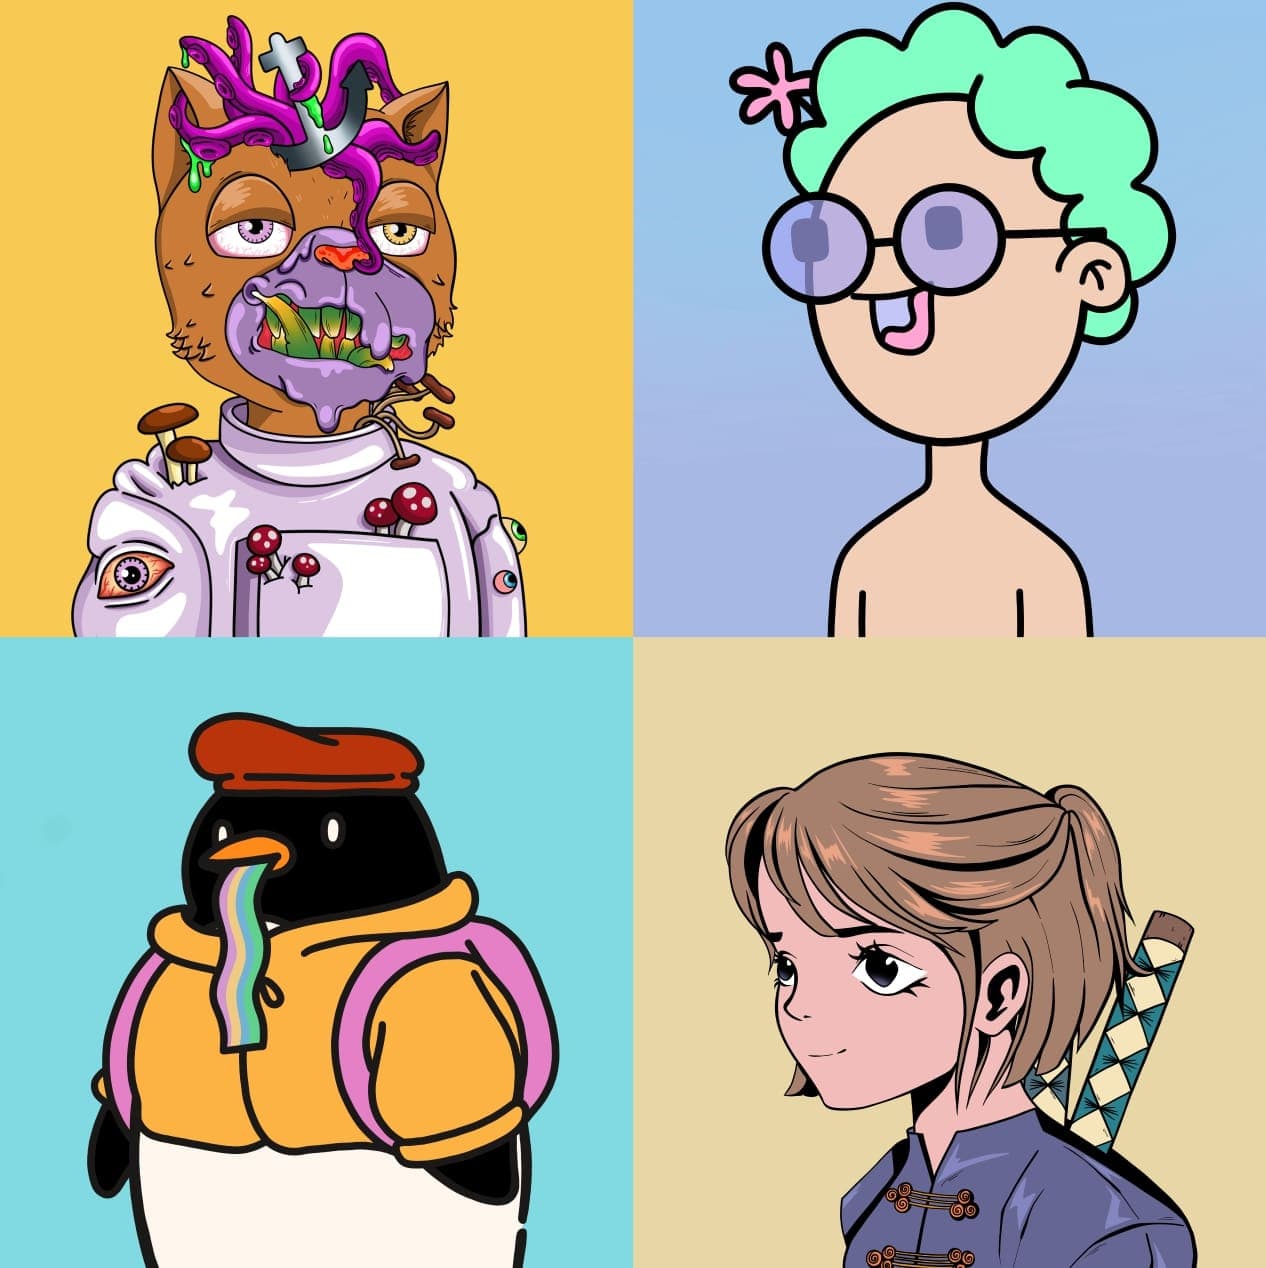
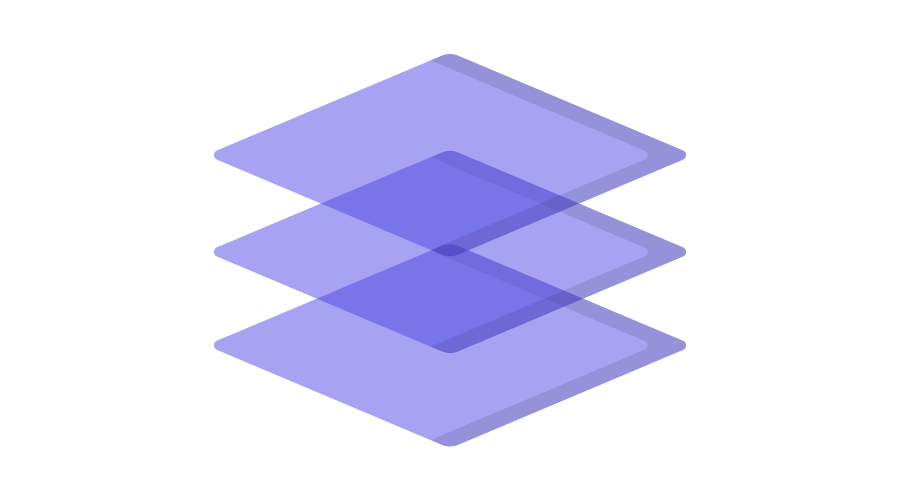
You might be wondering what layers are. If you don’t know what layers are, this image might help clarify what layers are and how NFT collections are generated:
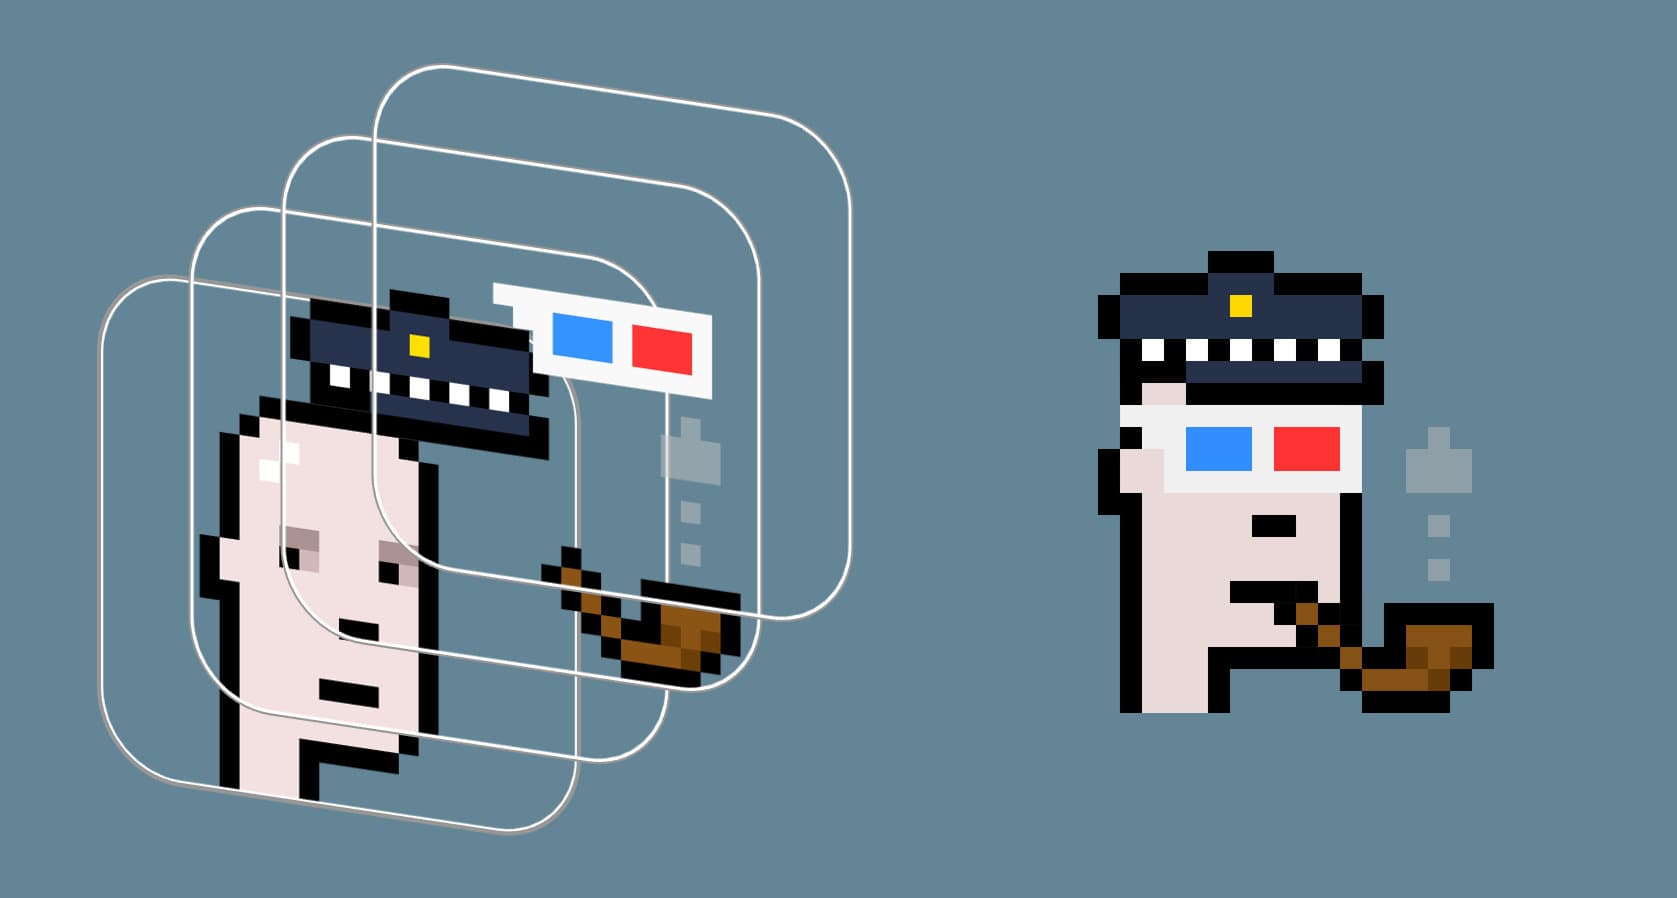
How CryptoPunks were generated
To try to explain the image above, this is what is happening:
The computer is taking a random image of each layer and putting one on top of the other to make a whole crypto punk.
So, the first thing it does is to take a face. Then, on top of the face it puts a hat. After that it picks some random glasses from the available options and puts them on top. And finally, as the finishing touch, it takes a random pipe from the available pipe designs and puts them on top of everything else.
That’s how one single NFT gets generated. The computer then repeats this process thousands of times and generates the whole collection. Every time it starts with the face (picking a random one) and moves on to the hat, afterwards it goes to the glasses, and lastly it finishes with the pipe.
This means that there is an order in the way that images are superposed on top of each other. The layers can be ordered from back (1st layer) to front (last layer) and the assets are put on top of each other following this order. From the thing that’s most at the back, to the thing that is most at the front.
Let’s go through an example of how the amazing CryptoPunks 10,000 unique collectible characters got made.
The first thing they did was to create 4 layers or folders: faces, hats, glasses, and pipes.
Within each of these layers (or categories) they went ahead to create several variations, for example, you could have different types of faces, several types of hats, and so on and so forth.
Once they had enough variations of their assets (images) within each layer, then they continued to run them through a computer program to create the generative art using the layers provided as inputs.
The more assets you have inside each layer the bigger your number of possible unique combinations will be.
For example, if they would have created 4 faces, 5 hats, 3 glasses, and 2 pipes, the total number of possible unique collectibles that they could have made would have been:
(4 faces) x (5 hats) x (3 glasses) x (2 pipes) = 120 different combinations.
However, if you put just a little extra effort and actually make 10 different variations of each type of asset, then you would have:
(10 faces) x (10 hats) x (10 glasses) x (10 pipes) = 10,000 different combinations.
As you can see, there is a stratospheric difference between the number of combinations that you can potentially make if you just add a few more assets as inputs when creating your generative NFT art collection.
Moreover, the more layers you create the bigger your collection will get pretty easily. For example, imagine that instead of creating 40 assets divided into 10 faces, 10 hats, 10 glasses and 10 pipes you would have created 5 faces, 5 hats, 5 glasses, 5 pipes, 5 earrings, 5 necklaces, 5 scarfs, 5 piercings.
If that would have been the case you would have no less than:
(5 faces) x (5 hats) x (5 glasses) x (5 pipes) x (5 earrings) x (5 necklaces) x (5 scarfs) x (5 piercings) = 390,625 different combinations.
That’s absolutely bonkers and you might be aware that it might be in your best interest to not make such as huge collection since a smaller collection makes assets more scarce, which makes them more valuable.
But that proves the point that the more layers you have in your artwork the less assets you will need to make to generate 10,000 unique NFTs.
This is how generative art is produced. You basically make different layers, for each layer you make a few different variations of your assets or images and then you use a program to make all possible combinations of the assets that you gave it.
If you are very mathematical included you might have noticed that there is something that we have not talked about in here up to these point, and that is the concept of rarities.
A rarity is how rare a specific asset is in your whole collection. For example: it might be very common for your NFTs to have cigarettes but not very common to have cigars. In that case cigars would be more rare than cigarettes.
Put in natural language, cigarettes are common cigars would be rare, and pipes would be ultra rare. By the way, these are the 3 categories of rarities that you can choose in our NFT generator.
For each asset that you upload you can choose if you want to make it common, rare or ultra rare to make certain NFTs super special by making them more scarce.
Congrats! Now you know how these collections that have thousands of NFTs are generated.
I guess now you must be wondering how can you get these layers to make your own NFT collection.
If that’s what you’re thinking you’re in the right place. Let’s dig into it.
How to get layers
Basically, you have two options when it comes to making layers for your NFT collection: you can either make them yourself, or you can pay someone to do it for you.
Option #1: Making your layers by yourself
If you are an artist or want to learn a new computer skill this route is for you.
If you go down this route, you will want to use a program like Photoshop or Figma to create the different layers that you will later use to create your collection using The NFT Generator.
Each layer will be a set of a few variations of the same asset. For example, different variations of a face, or different variations of a body, or different variations of eyes.
Whatever it may be you will be making different variations of the same item and the sum of these individual variations will constitute the layer.
There is a couple things to keep in mind when making your assets (this also applies if you choose to hire someone to do it for you):
The first thing to keep in mind is that absolutely every asset of every layer should be made using the same canvas size. This will permit to stack them one on top of the other in the correct places. Otherwise you might end up with eyes in your chest or the mouth where the forehead should be.
The second thing to keep in mind (which is pretty obvious I know, but still) is that each asset should have a transparent background. If you want to make background they should be a layer of their own, and that would be the first layer that you would add when making your collection using the generator.
It is important that you double check that the background of each asset is indeed transparent as soon as you make it. Otherwise you might find out that your assets don’t actually have a transparent background after you’ve finished creating all of your assets and you might have to start all over.
If you are not an artist but you want to learn how to use these applications to create your own layers for your next NFT drop there are tons of tutorials on YouTube that can get you going.
However, if you are not an artist or you just don’t feel like learning how to use a computer software to create your own NFT collection you can also simply hire someone to do it for you.
That brings us to the option #2.
Option #2: Hire someone to do your layers for you
If you don’t feel like creating these layers yourself and you just want to pay and go, then this is the route for you.
Using a tool like Upwork or Fiverr you can easily hire someone anywhere around the globe to do the work for you. Both of these websites can give you access to a large pool of talented people that can deliver the layers that you need according to your instructions or general guidance.
You can just go to one of these sites (or any other that you like) and look for someone with Photoshop or Figma skills on the platform, explain your project, and pay to get the work done.
In general, these freelancers deliver in a very short time. Some of them even offer 24-hour delivery which means that you could be creating your 10,000 NFT collection tomorrow!
You can simply explain the general idea of your project, how many layers you want and how many assets per layer. If you have some mockups or sketches that would be an even better place for the freelancer to start since it will help them get aligned with your vision for the project.
Final Steps
Once you have your layers ready you can then upload them to our NFT generator and you can download your new collection right away.
Our generator is super easy to use. We have taken extra care to make it the simplest and easiest NFT generator on the block.
However, if you want a step-by-step guide to know how to use our NFT generator feel free to check out our next blog post where we explain in detail the step-by-step process that you need to follow to use The NFT Generator and download your collection right away.
We wish you the best of success with your NFT drop and we hope you use us again for your next big project, see ya!